Latest Event Updates
Lesson Plan Version 4.0: Networked Learning Revision
 Writing lesson plans can be a tough task when students have so many different learning needs. There are various frameworks that one can analyze a lesson through which helps to achieve the goal of trying to meet students’ needs. I have been working on revising a sixth grade math lesson by examining it through the TPACK lens (Technological, Pedagogical, and Content Knowledge) as well as a UDL lens (Universal Design for Learning) and have made several changes to it thus far. I am now going to be evaluating this lesson by looking at it from a Networked Learning perspective.

Networks are powerful learning tools. Whether it be connecting with others digitally or talking to someone working right down the hall from you, networking can open a world of possibilities. In a previous assignment in the MAET program, I looked deeply at my own personal learning network (PLN) and reflected on the importance of having an ever growing PLN. I also realized how vital it is to utilize this network whenever possible.
In revising my math lesson on parallel lines cut by a transversal, I thought it would be best to begin by looking at how I could use my PLN to enhance this lesson and then look at how I can incorporate opportunities for students to use networked learning. I am lucky in that I work with an amazing group of teachers whom I can bounce ideas off of daily. It struck me that I need to take advantage of this in prepping for this particular lesson. It would make sense that I should connect with the teacher my students had the previous year to see if they touched on this topic last year and how it was received if they did. This will give me some background on the students’ knowledge and a sense of any prior misconceptions. Utilizing this network connection may seem simple, but it is vital.
Another revision I am looking at has to do with the screencast portion of the lesson. In my original plan, I was going to use a lecture format. However, after looking at it through a TPACK lens, I decided to change routes and use a screencast to convey the topic. Educators tend to be awesome because they like to share ideas and resources with other educators. Therefore, there may already be a screencast or video that I could use that teaches parallel lines cut by a transversal. When thinking about my own PLN, I realized that I could check out Youtube or Educreations for an already made, teacher created, screencast. Who knows, it may be better than anything I could have created myself!
After looking at how I can use my own PLN to help me in preparing for this lesson, I wanted to take some time to delve into how my lesson already incorporates the ideas of networked learning and what more I could do to enhance this kind of collaboration. In this lesson, the students work in groups of three to complete an activity involving creating parallel lines and finding angle relationships. This type of group work is an example of networked learning because they are reaching out to their peers and helping each other learn the concepts of parallel lines and angle relationships. It is common knowledge that often times when a student can teach someone the concept they just learned, it shows a deep level of understanding. By working in groups, students are given this opportunity to teach one another and learn from one another and build their own learning networks.
As the students are working on the group activity, they are allowed to go back to the screencast if they need clarification or help remembering one of the angle relationships. After thinking about learning networks, I thought it would be good to add in links to extra Youtube videos about parallel lines cut by a transversal because sometimes students need to hear an explanation of a topic in multiple ways before they understand it. Students would be able to learn from a wider network of teachers by accessing these approved videos. They would be learning not only the concept of parallel lines but also the much broader idea of how helpful it is to reach out to others to gain information.
Networked learning is an essential aspect of developing knowledge. If you think about it, we all probably use networked learning on a daily basis. I believe it would be hard to think of one day where you didn’t learn something from someone else, whether it be from a coworker, a news report, or a Youtube video. By reaching out to these networks and having students do the same, my math lesson will be greatly enhanced.
References:
Connected [Online Image]. Retrieved July 18, 2015 from https://pixabay.com/p-358063/?no_redirect
Content Curation

During the Master’s in Educational Technology summer program, one person is chosen each day as the content curator. You might be asking what a content curator is because I know I certainly had no idea what that meant when I first heard the term. Basically, that person is responsible for analyzing the day’s activities while making connections to our learning and highlighting the wonderful work that we are all doing in the MAET program. Each day is different and brings about new challenges and exciting activities. Having the content curation pages allows students to remind themselves of important learning experiences.
I was chosen as content curator for Thursday, July16. With my camera in hand (you basically could call me the paparazzi that day) I took lots of pictures to document the day’s events. Then, I used smore.com to create my page of content with lots of pictures. Check it out here!
Quickfire-Popcorn Maker
This blog post was a collaboration between Erin Dennis and me.
Building an educational video is not an easy process, even when it involves finding pre-created materials remixed together into something new. We wanted to try to make things easier on ourselves by choosing a topic that lends itself to this format, so we picked Digital Storytelling.
Our first struggle came with trying to get everything to line up in the timeline. We decided to start with a video and wanted to figure out how to get text to line up with an action in the video. Looking back, this was probably not a wise thing to do as this was our very first attempt at using Popcorn Maker and this action requires a lot of skill.
As we started adding in images, we realized that we were having a pretty severe difficulty: we couldn’t move text around on the screen. After much playing, we determined that it was a problem with trying to use Popcorn Maker on a chromebook (Popcorn Maker WILL work on a chromebook, but not every feature plays very nicely, so don’t try to do anything too finicky).
Once we switched devices, things started to move along a lot nicer and we could actually divide the work.
Afterword: As we were finishing up, we were reminded that we should not have used an audio track in our creation of the video, so, were we to do this again, we would add in more pop-ups to explain Digital Storytelling rather than a narration track. Remember to read the assignment!
Without further adieu, here is our Quickfire Popcorn Maker video on Digital Storytelling..
Personal Learning Network (PLN)
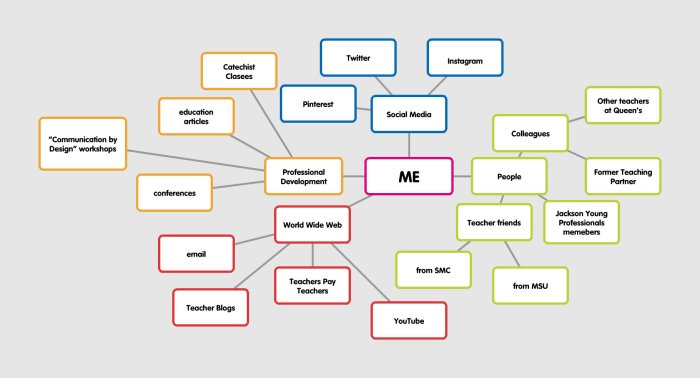 Who and what do you learn from? That is the question I asked myself when I begin mapping my personal learning network (PLN). You can see from the image that I reach out and learn in a lot of different ways. The four categories that I came up with include People, Professional Development, Social Media and the World Wide Web. Having these resources allows me to connect with all kinds of educators, near and far.
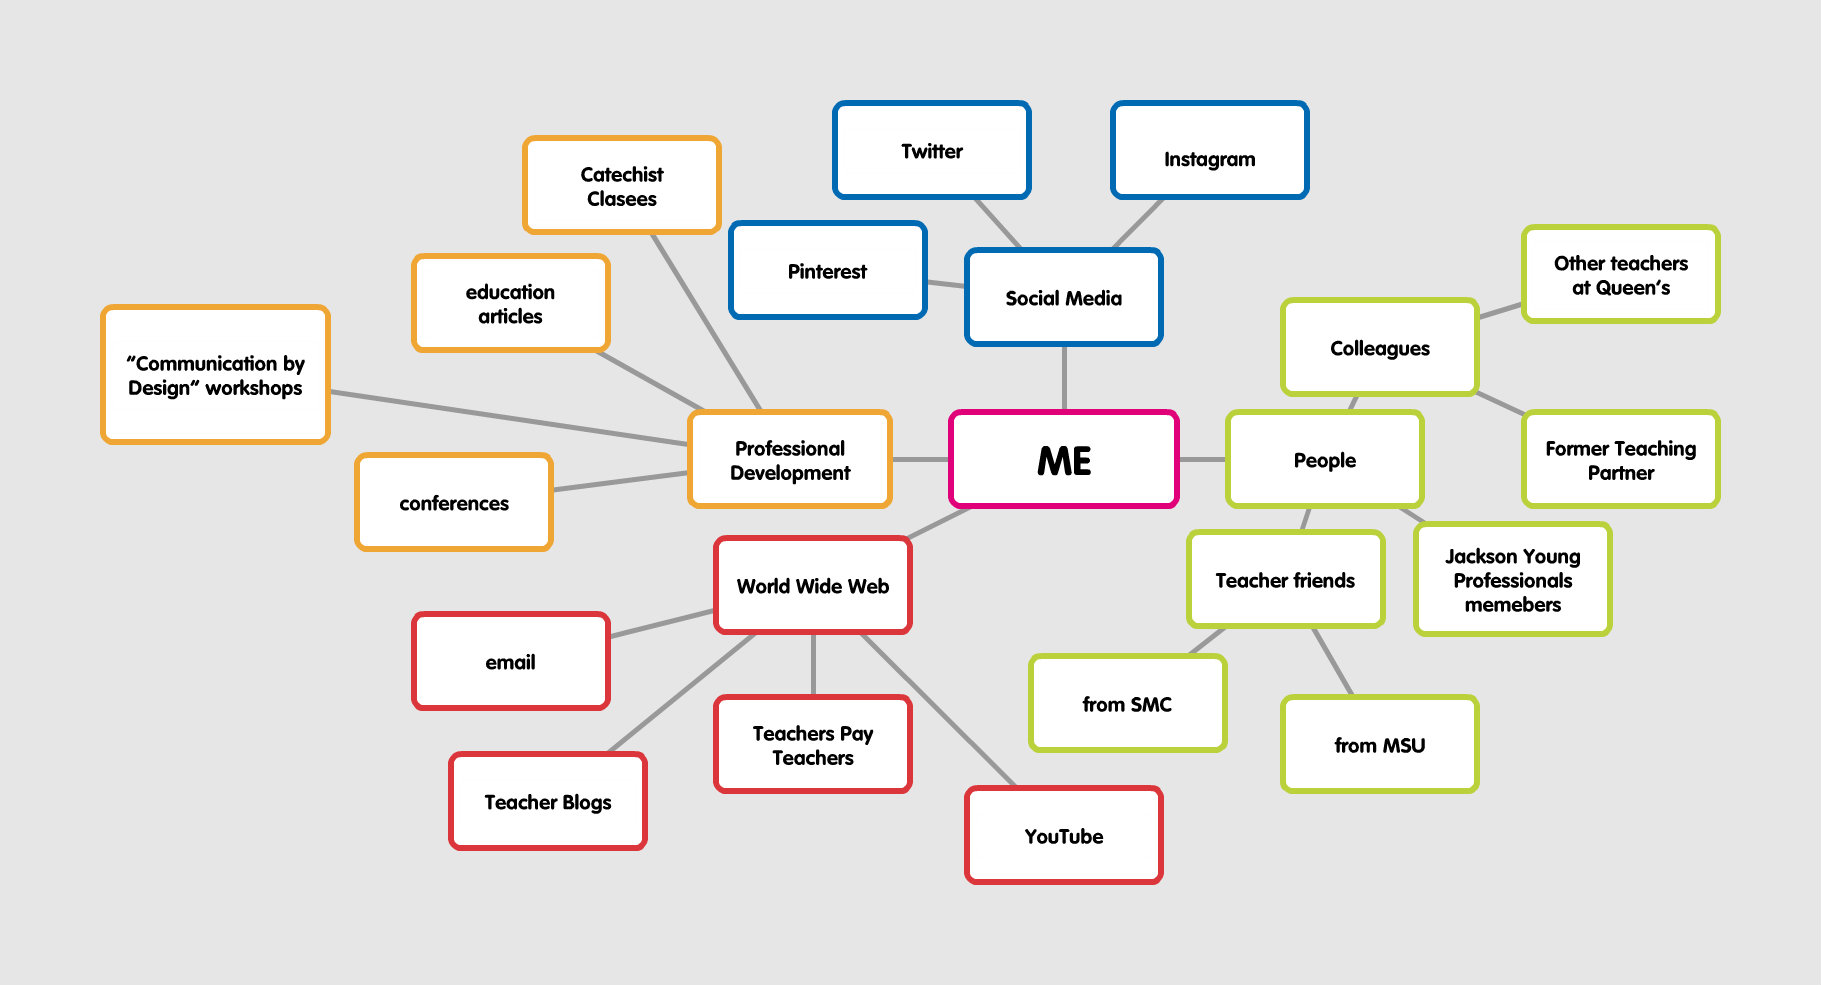
The internet opens up a whole door of possibilities that once never existed. Twitter for example is something I am relatively new to, but quickly learned that it is an awesome way to connect with teachers and educational professionals and is extremely easy to do so. Pinterest is another way to see all the neat ideas teachers have out there. Teachers used to have to collect ideas and pin them to a physical bulletin board which didn’t allow for much collaboration. Now we have digital pin boards through Pinterest where everyone can share ideas.
In education, I believe that collaboration is key and my PLN makes that clear. It is a flexible network that is always changing and growing as I become aware of new resources, meet new professionals, and discover different social media platforms.
Lesson Plan Version 3.0: UDL Revision
 There are many valuable educational frameworks to look at and use when composing lesson plans. Previously in the Master’s program coursework, we dove into one framework called TPACK. We then quickly jumped into a new framework called UDL.

UDL stands for universal design for learning and “is a set of principles for curriculum development that give all individuals equal opportunities to learn” (About UDL, 2015). The three guiding principles of UDL are: provide multiple means of representation, action & expression, and engagement (CAST, 2011).
It will be through this framework that I will be analyzing my sixth grade math lesson on parallel lines cut by a transversal. This is the same lesson I recently revised using TPACK (see revisions in purple). I began this UDL process by using an Educator Worksheet to brainstorm ideas. You can read about that beginning task here. I also researched a math learning disability called dyscalculia to determine strategies that will not only help students struggling with this disability, but also all learners in the classroom.
In order to provide multiple means of representation, I revised my lesson so that I use the SMART board, iPads, a screen cast, manipulatives, paper, and colored pencils. In doing so, I was able to incorporate various mediums. This lesson begins with a short video clip showing a gymnast on parallel bars. Viewing this will lead to a discussion of parallel lines and their relationship to the real world. The use of the words “interior” and “exterior” will be looked at and applied to every day situations. This will prep students to be familiar with these words when they show up in angle relationships. These discussions will help students activate their prior knowledge. This is a key component of guideline one, strand three of the UDL framework (CAST, 2011).
Action and Expression is the second main guideline in the UDL framework. One of the main components is to “provide options for physical action,” so I am revising this lesson to include manipulatives (CAST, 2011). I will have the students watch the screen cast with the necessary subject content. Then, they will apply what they’ve learned by using Twizzlers to form parallel lines and transversals, and colored beads to show certain angle relationships.
According to Paul Flinter, for children with dyscalculia, “concepts have to be made the subject of instruction and this means learning situations must include concrete manipulative materials and direct hands-on experiences” (1979). Flinter is correct, but this statement could really apply to all children which shows how seamless UDL is. The students will be modeling these different angle relationships and then transferring that image to their notebook and labeling it appropriately. In one article, Matthew Michaelson gives strategies for improving math problem solving skills for dyscalculic learners (2007). One suggestion is to use colored pencils to bring attention to different parts of the question (Michaelson, 2007). By using colored pencils to code the congruent angles in their drawn images, it is helping all students to see these relationships more easily.
The third principle of UDL is to provide multiple means of engagement (Cast, 2011). The instruction will take place directly. However, instead of lecture, it will be through a screen cast available on the iPad. This will allow students the ability to pause and rewind if they are confused. This gives them the opportunity to self regulate their learning thereby incorporating an important part of the third principle of UDL (CAST, 2011). Another strategy Michaelson gives is to allow them to “move through a lesson at the student’s own pace so that he or she does not become bogged down by the material” and the screen cast allows them to do just that (2007).
Fostering “collaboration and community” is another important part of the UDL framework and something that I strive to create (CAST, 2011). By having students work in groups while learning with manipulatives, our classroom community is strengthened.
Check out my UDL revised lesson! (Remember, my TPACK revisions are in purple. My UDL revisions can be seen in green.)
References:
CAST (2011). Universal design for learning guidelines version 2.0. Wakefield, MA: Author.
About UDL | National Center On Universal Design for Learning. (2015.). Retrieved July 15, 2015, from http://www.udlcenter.org/aboutudl
Michaelson, M. T. (2007). An overview of dyscalculia: Methods for ascertaining and accommodating dyscalculic children in the classroom. Australian Mathematics Teacher, 63(3), 17-22. Retrieved from http://ezproxy.msu.edu/login?url=http://search.proquest.com/docview/62055718?accountid=12598
Flinter, P. F. (1979). Educational implications of dyscalculia. Arithmetic Teacher, 26(7), 42-46. Retrieved from http://ezproxy.msu.edu/login?url=http://search.proquest.com/docview/63798779?accountid=12598
UDL Educator Worksheet
 In the Master’s Program in Educational Technology at MSU, we have recently been looking at various frameworks that we should keep in mind as we are creating lesson plans. Previously we learned about TPACK and today we moved right in to learning about UDL (Universal Design for Learning). I have been working with a sixth grade math lesson plan about parallel lines cut by a transversal and the angles and their relationships formed when this occurs. I recently analyzed my lesson through the TPACK lens. I am now in the process of revising this lesson through the UDL lens. In order to get started in this revision, I filled out a UDL educator worksheet to brainstorm thoughts. I will soon be taking these ideas and revising my original lesson. Check back soon for another post about my revision!
Picture retrieved from http://www.udlcenter.org/aboutudl/take_a_tour_udl
Lesson Plan: Version 2.0, TPACK Revision

If I could use one word to sum up our learning experience today it would be, TPACK. Our focus centered around the technological, pedagogical, and content knowledge framework. As mentioned previously in a blog post, it is where these three ideas overlap that the conditions are right for dynamic learning to take place. These three knowledge bases cannot be thought of in isolation; rather they must be interwoven to create purposeful lessons (Mishra & Koehler, 2009). It has long been a standard in education that content and pedagogy are integral and now that idea is expanding to include technology. “Rapid changes in technology have added a new kind of knowledge that educators have to integrate with pedagogical and content knowledge” (Mishra & Koehler, 2009). It is through this TPACK lens that I will analyze my lesson plan version 1.0.
CONTENT
When looking at my sixth grade lesson plan about parallel lines cut by a transversal and the angles that are formed, it is evident what the content is. Students at this grade level need to understand angle relationships and the congruencies that are implied by these different relationships. The context of this lesson falls within the geometry unit that I teach to students in my accelerated math class. These children have a strong mathematical knowledge foundation and in order to excel in this lesson they must have prior knowledge about what an angle is, how an angle is formed, what the word congruent means, and that all angles have a degree measure. In this lesson 1.0, I then build on these concepts.
Pedagogy
Referring back to my lesson plan version 1.0 and taking a look at it from a pedagogical standpoint, it is very apparent that I use a lot of direct instruction while also always questioning the students to see if they can come to the correct conclusion first, before I explicitly tell them the correct answer. I begin the lesson with a hook to grab my students’ attention as well as use discussion, real world examples, and individual work to assess my students’ learning. My lesson plan is clear, organized, and through the instructional sequence, it is evident that my two objectives are met.
Technology
In this lesson, I use very little technology but am excited to revamp it at some point in the near future. The hook in my lesson is a youtube video showing a gymnast on the parallel bars. In order to show a video, I will need the computer, projector and SMART Board. Students are also using various colors of pencils (while definitely older technology, we still need them).
Where is the overlap?
The ultimate goal of TPACK is to have these three domains overlap. I do have some interaction in this lesson. The showing of the youtube video is one example where content, pedagogical and technological knowledge interact. Pedagogy tells me I need a way to hook my learners, technology allows me to do that through the use of a video that represents the content by giving a visual representation of parallel lines. Pedagogical and content knowledge overlap when I have the students draw their own example of parallel lines and a transversal in their notebook and show the angle relationships in different colored pencils. Drawing their pictures and owning the material in their notebook, allows for a better transfer of content knowledge. As a teacher, I need to have the knowledge of parallel lines and transversals, as well as understand the common misconceptions that students often have so that I can correct their misunderstandings and they can build upon accurate knowledge. My ability to relate parallel lines to real world contexts (such as railroad tracks, lines on a football field etc.) will also be necessary. These are two other ways pedagogy and content interact.
Is there room for improvement?
When looking at this lesson as a whole, there is definite room for improvement after learning about the TPACK framework. I believe that the content is there, but the pedagogical and technological components could be enhanced. This will only happen if I start experimenting with the TPACK framework and deliberately practice it in my lesson planning (Mishra & Koehler, 2009). I look forward to continuing to revise this lesson and incorporate different frameworks so I can teach this topic most effectively.
References:
Mishra, P. & Koehler. M. J. (2009). Too cool for school? No way! Using the TPACK framework: You can have your hot tools and teach with them, too.
Learning & Leading with Technology, 36(7), 14-18.
TPACK image: Retrieved from http://tpack.org
Cooking with TPACK
Today we did a quickfire that involved “Cooking with TPACK”. I have to admit that I had a lot of fun while learning at the same time! The purpose of the activity was to get us thinking about what TPACK is and how we can implement this lens of thinking into our classroom lessons. You’ve seen this word “TPACK” three times now in my blog post so far and you might be asking what exactly it is. TPACK stands for technological, pedagogical, and content knowledge framework. Now you might be asking, what does this mean? “The skills, competencies, and knowledge specified by the TPACK framework require teachers to go beyond their knowledge of particular disciplines, technologies, and pedagogical techniques in isolation. This is a contingent, flexible kind of knowledge that lies at the intersection of all three of these knowledge bases, allowing the creative repurposing of the traditional approaches“ (Mishra & Koehler, 2009, p. 16). the TPACK framework helps teachers to understand that it is at the crossroads of these three ideas where learning becomes purposeful. Many technologies were not created specifically for classroom use. As teachers, we need to take technology tools and find creative ways to repurpose them to create meaningful lessons (Mishra & Koehler, 2009, p. 16).
Through the quic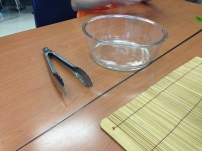 kfire lesson today, we got a chance to repurpose tools ourselves. The activity began with us getting into groups of two or three. I was lucky to work with Donna and Rosie. We were told that one person from our group (we chose Donna) needed to select from a set of given supplies, two items. She was to choose one cooking tool and one vessel, yet we still had no idea what exactly our task was going to be after that. Then we were given a sticky note which told us what we were to create using these tools. W
 e were to create, drum roll please….a yogurt parfait! YUM! You can see the only supplies we had to work with in the picture. As a group, we brainstormed the best way to create our breakfast dish. We decided to crush the granola bars using our fists and tongs. Once these were crumbled, we mixed the yogurt with the tongs and started layering the yogurt and granola. We added two strawberries to the top for a beautiful presentation (shout out to Alan, David, and Erin for sharing the strawberries with us)! Our group was pretty proud of the way that our dish turned out, and it was quite delicious as well! Each group’s dish was impressive!


This was a very neat activity, but what did it have to do with teaching, learning, and technology? This quickfire was an effective way to emphasize the fact that content, pedagogy, and technology need to fit seamlessly together. Just as we would normally not choose our tools before we knew what we were to cook (our content), we shouldn’t chose a method of technology before we know our subject. Had we known that we were going to be creating a yogurt parfait, we probably would not have chosen tongs as our one and only tool. We learned first hand that by choosing our tool first, it made it more difficult to implement the content. In my opinion, some of the groups got really lucky in choosing their tools (who would have guessed that when one group grabbed a pitcher and a whisk that they would end up drawing a sticky note that told them to create whip cream). That just goes to show what might happen in the classroom. I may choose a tool to start with and I might be able to create an effective lesson around it. However, that does not mean that was the best way to go about it because often times I may not get so lucky!
“Teachers need to develop a willingness to play with technologies and an openness to building new experiences for students so that fun, cool tools can be educational” (Mishra & Koehler, 2009, p.18). This is the direction that all teachers need to be moving in. However, we cannot get caught up with just the technology tools. The technology is not the sole focus of the lesson, the content is key. We need to understand that content, pedagogy, and technology should not exist in isolation. When we are confident with our content, we can choose from a variety of technology tools in our toolbox to use in order to create the most effective lesson we can.
References:
Mishra, P. & Koehler. M. J. (2009). Too cool for school? No way! Using the TPACK framework: You can have your hot tools and teach with them, too.
Learning & Leading with Technology, 36(7), 14-18.
Lesson Plan: Version 1.0
For this assignment, we were given the task to write up a lesson plan that we currently use or would like to use in our classroom. This assignment is only the beginning of a much bigger project, as we are going to be revising this lesson many times incorporating knowledge that we learn as we progress through the MAET courses.

I chose a sixth grade math lesson that teaches about parallel lines cut by a transversal and the angle relationships formed when this happens. It also discusses how to find the measures of these different angles. When two parallel lines are cut by a transversal, eight new angles are formed. Students will learn the names of these angle relationships (supplementary, adjacent, corresponding, vertical, alternate interior, and alternate exterior). This lesson is within my geometry unit that I teach towards the end of the school year. In the beginning of this lesson I use a quick youtube video to get their attention. Sixth grade students will most likely have some prior knowledge of parallel lines, but the word and concept of a transversal as well as the different angle relationships will all be new. In order to assess the students, I observe as we are discussing the lesson in class and the students also complete a workbook page to show what they have learned.
I am excited to see how I can transform this lesson with the knowledge that I have and will gain through participation in the MAET program. I already have a few ideas to revamp it and am looking forward to doing so!
Photo retrieved from https://commons.wikimedia.org/wiki/File:Parallel_Lines_-_geograph.org.uk_-_992120.jpg
Quickfire-Maker Faire Lesson Plan
 For me, yesterday’s quickfire assignment, which was to get us thinking about curricular connections to “making” as pedagogy, was way more stressful than I had anticipated! We were put in groups to work on this activity and my partners were Alan (an elementary school administrator) and Hayley (a first/second grade teacher). If I have yet to mention, I teach sixth grade. As you can tell, although we all work in elementary schools, our areas of expertise differ. Our goal for this project was to first decide on one of our grade levels and what specific content at that level we wanted to focus on. This proved to be much more difficult than expected! Once that was established, as a group we were tasked with writing a lesson plan for that content that was inquiry based and included a maker kit. Easy right? WRONG!
We began with one idea and after talking with our instructor (thanks Mary…we needed the help!) went in a total different direction, with not much time left to work. Our original idea was too focused on the technology and not centered enough around our content, and the content was the point of this lesson. We decided to tackle a lesson addressing the first grade standard of adding numbers within 20. Part of the lesson involved the students playing a board game and this is where we incorporated a Squishy Circuit Kit. The students would be answering addition problems as they traveled around the game board. There would be two answers and if they touched the right one using a metal pointer of some sort, the light bulb would light and they would instantly know they got the answer correct. You can see our original lesson plan here.
Once we put together the lesson plan, we shared our ideas and received feedback from our classmates and instructors. Our next task was to individually revise our lesson plan after receiving this feedback and taking time to make connections to our readings and what we’re learning in theory. You may be thinking there is no way that addition would be taught in sixth grade, but it sure is! There is one big difference though; we use positive and negative numbers. While making revisions to this lesson plan, not only did I have to update simple things like the standard and extending it to integers, I also wanted to really think about what we’ve been reading in class. We have talked a lot about building on prior knowledge, looking at “big ideas”, and building conceptual knowledge. Integers can be a challenge for students especially when they first start working with them. However, if you relate them to real world situations, it makes a whole lot more sense to them (think temperature, credits/debits, above/below sea level). This is building on concepts they are already familiar with! Therefore, I added in my revised lesson plan to relate addition of integers to real world problems.
The inquiry comes into play when the students are developing their own integer addition story problems and writing mathematical equations to express these stories. They are figuring out based on prior knowledge, how to add integers. Inquiry is also at work when students are playing the board game. Not only during play but there might even be students who are interested in how the game board works with the circuit underneath. This may be a great extension activity especially if they are interested because we’ve learned that when they are intrigued, they are much more motivated.
One piece of feedback we received that I kept in my revised lesson plan was the fact that it was good that there were many little activities through the lesson. During the lesson, students move around the room, discuss in groups, work individually, and play a game. Elementary students’ attention spans are quite short and by keeping activities moving, they are more likely to stay engaged. Check out my revised sixth grade lesson plan. You can see the changes and additions I made in blue.
In the end, this activity really made me think critically and step away from using the maker kit simply to teach about a circuit. We were able to incorporate the kit, but the focus of the lesson was not the technology, it was the content. Learning the theory behind the maker movement is one thing, but I learned that putting it into practice takes time and thought. It can be difficult and overwhelming, but on the other hand, it prods you as a teacher to step out of the box, be creative, and get into the maker mindset. Anything worth doing is going to have its challenges but with more and more practice, I hope to reframe my thinking when developing lesson plans and embrace the maker movement.
Photos from:
http://www.amazon.com/Squishy-Circuits-Kit/dp/B00J53O4U0
https://en.wikipedia.org/wiki/Ludo_(board_game)
https://pixabay.com/en/sign-plus-add-arithmetic-27080/
https://sites.google.com/site/rushmathroom/assignments/algebra/integer-webquest
- ← Previous
- 1
- 2
- 3
- Next →
